Quick $50 Linen Closet Makeover

I’ve heard a few people refer to this past week as “the week that felt like a month,” and I couldn’t agree more. So much has changed in such a short amount of time, and my life “schedule” has been turned upside down. I hope everyone is staying well and trying to find a little joy in some of the new changes.

If, like me, you’ve suddenly found yourself with a lot of free time, then let me encourage you to tackle a quick and easy DIY project!

My husband and I completely transformed our linen closet for $50 in just four days. (It would have taken much less time, but we got a little lazy with painting the coats on the shelves, haha.) It was very simple, and I thought I’d share a short tutorial with you.

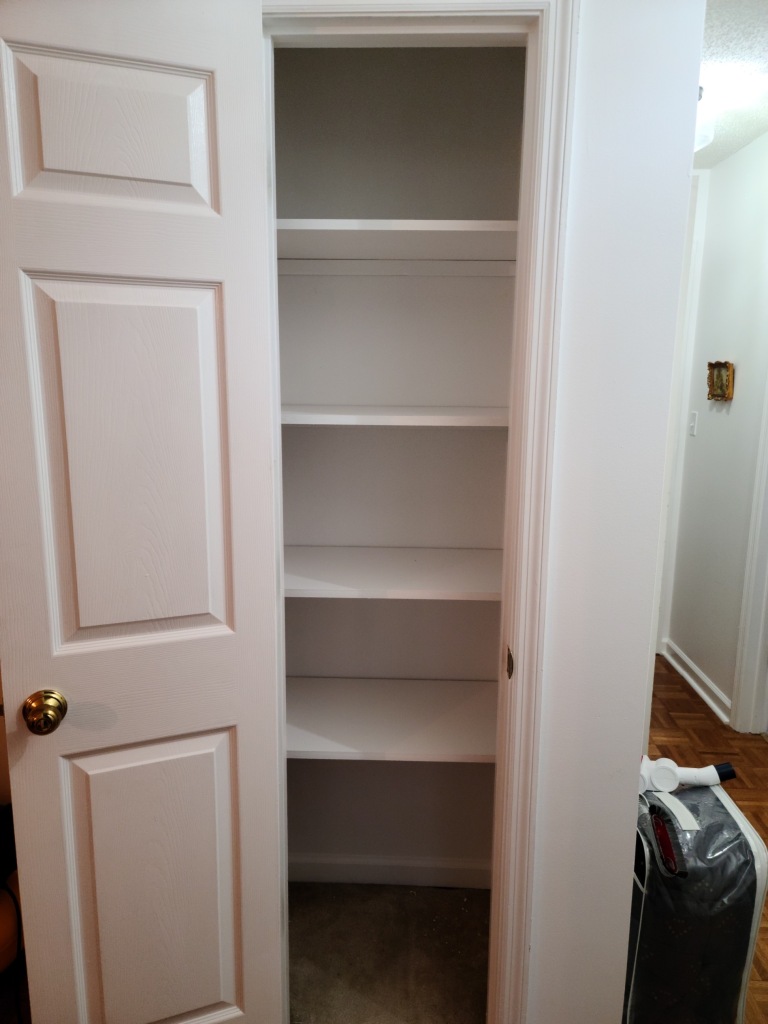
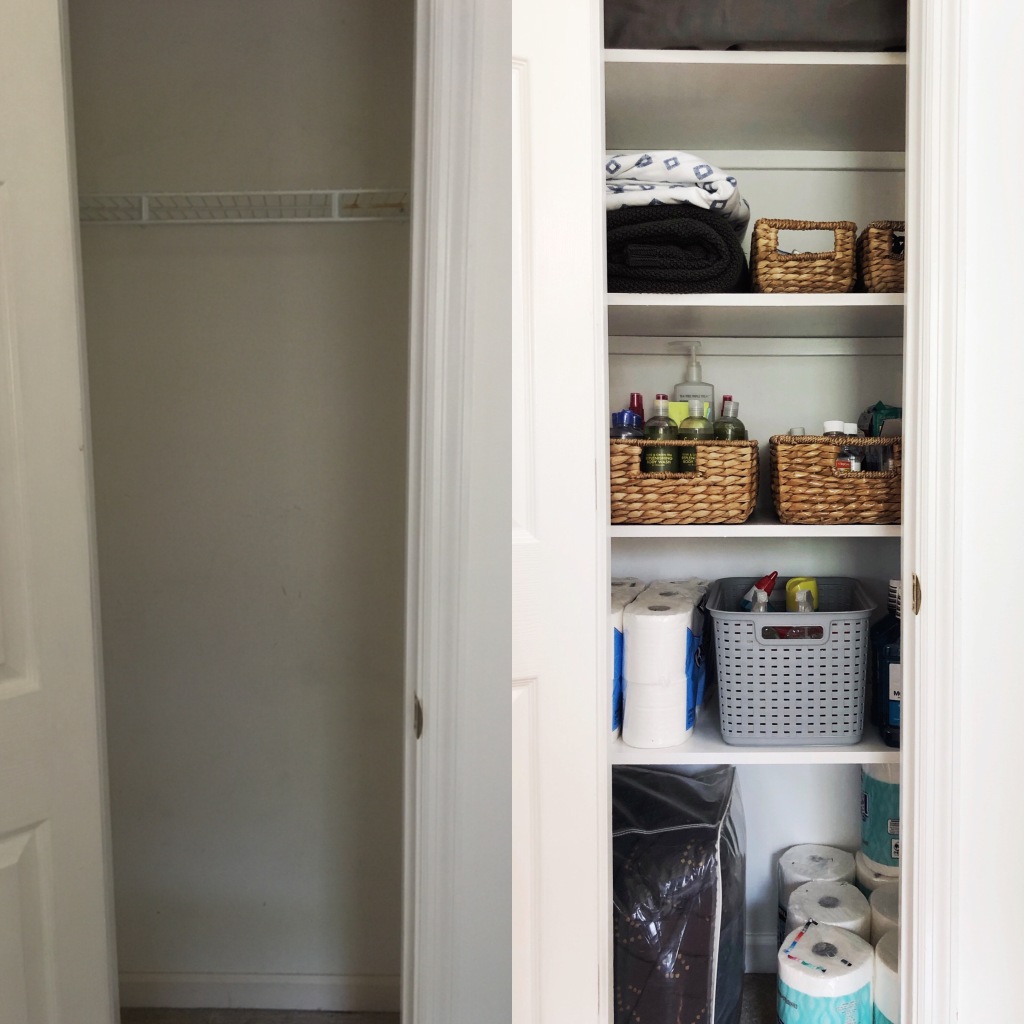
Before I get started, I wanted to share a photo of the “before” and talk about the space. When we moved in, this closet had only one wire shelf.

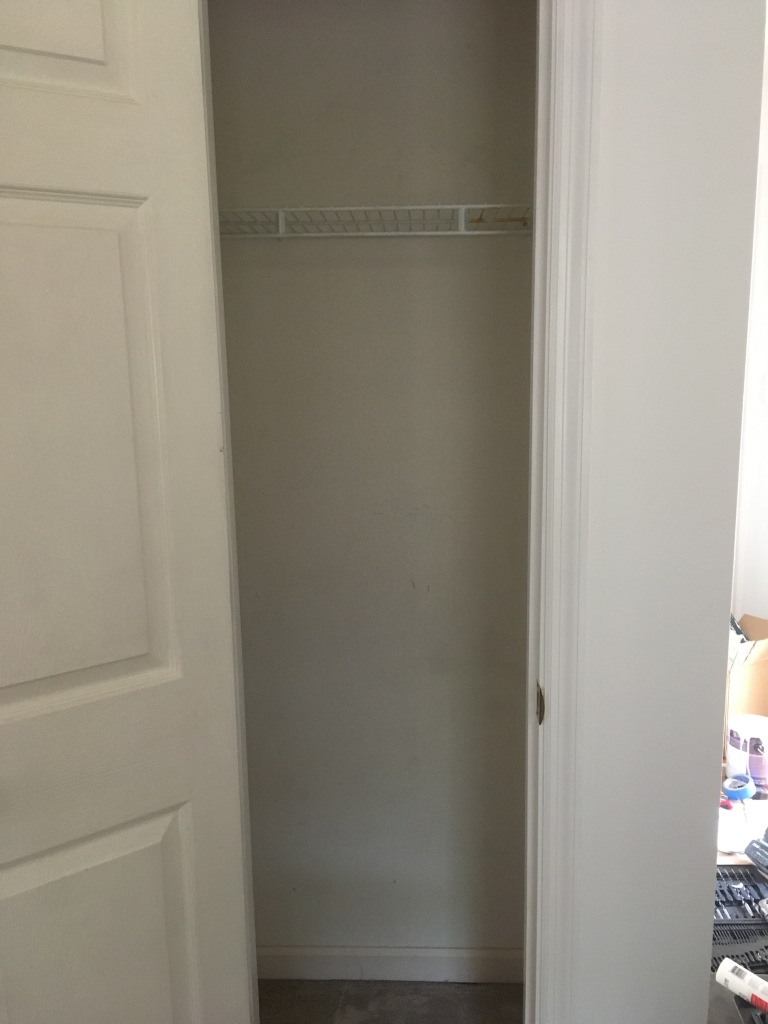
Since there is already a full-sized coat closet elsewhere in the house, I am kind of stumped as to what this closet was intended to be used for. Storing the vacuum, maybe? *shrugs* Since there was no linen closet anywhere in the house, we decided that this space would be the perfect place for one if we added more shelves. Meanwhile, our pantry was working overtime trying to function as a pantry and linen closet. It was not pretty.

We had to devote two of our pantry’s four shelves to storing things like paper towels, extra soaps and toothpaste, and extra cleaning supplies. It was definitely not ideal since (1) it left us with very little room in our pantry and (2) I hated storing chemicals and soaps in the same location as food (even though I was always careful to only put them on the bottom shelves and stored them in bins as an extra precaution). As you can see, we were very motivated to gain some more usable storage space!

Okay, let’s get into the tutorial.

DIY Linen Closet Shelves

This project requires very few materials and tools, and you might even be able to do it without going to the hardware store if you have any spare paint and wood. Here’s what we used to complete this project:

Tools & Materials

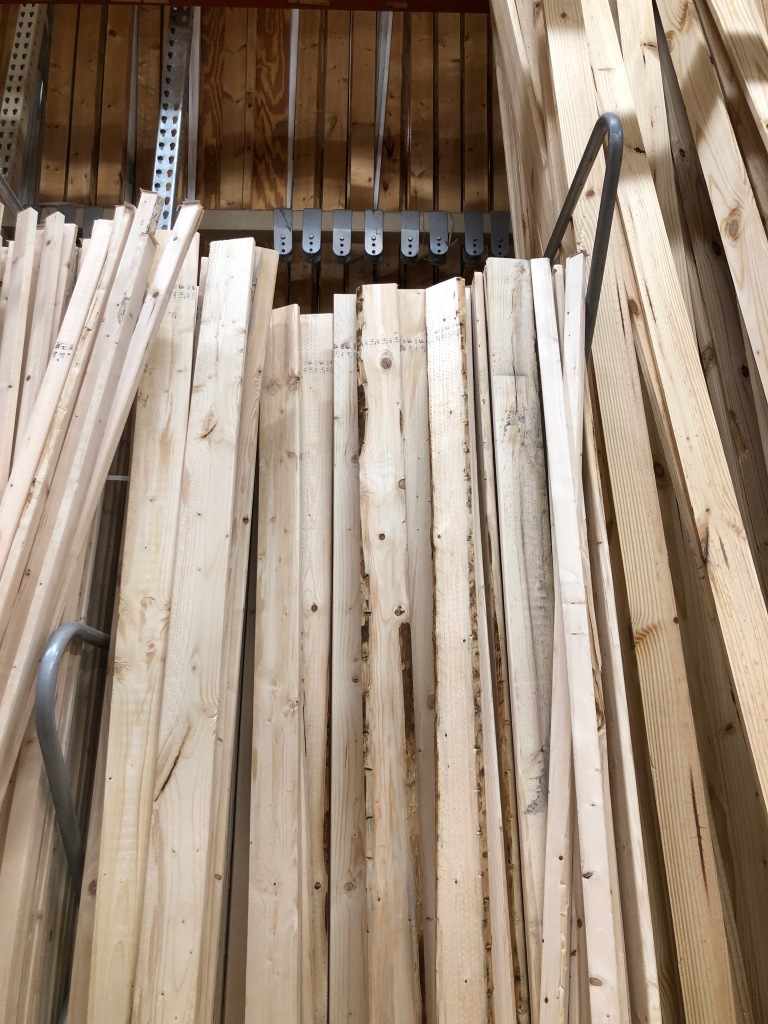
  • Three pieces of 1×2 in. pine
  • As many shelves as you need in whatever size you want (we bought one large piece of MDF and had a Home Depot employee cut it into four 26×19 in. shelves) (YES! You can have your wood cut for you for free at Home Depot and Lowes!)
  • Finishing nails
  • Spackle or wood filler
  • Trim paint (we used Behr Nano White in a semigloss finish)
  • Wall paint (we used Behr Nano White in an eggshell finish)
  • Measuring tape
  • Level
  • Stud finder
  • Spackle knife
  • Saw (for cutting the 1×2 in. pine)
  • Sander (to sand the 1×2 in. pine)
  • Nail gun or hammer (we purchased this nail gun and compressor for this project, but we have several other projects planned that will use this tool)
  • Paint brushes or rollers
  • Paint cup or tray (depending on how you are painting)
  • Drop cloth
  • Pencil or pen

1. Gather tools and materials.

First, gather your tools and materials. We had everything we needed except the wood (and nail gun/compressor), so our trip to the home improvement store didn’t take very long.

Before you go, decide how much wood you will need. We determined our ideal shelf size and number, and then we determined how many inches of the ledge pieces we would need.

At Home Depot, we got three pieces of 1×2 in. pine (to serve as the shelf ledges) and one large piece of MDF, which we had a very nice Home Depot employee to cut into shelves for us. I recommend asking an employee to cut your wood for you, especially if you don’t have a truck or a circular saw at home. Home Depot and Lowes will usually do up to 12 cuts for free, and after that, I’ve heard it’s only a dollar or two per cut. Worth it!

2. Prep the 1×2 in. ledges.

Since we had a saw at home, we opted to cut the 1×2 in. pieces ourselves. First, Kendall measured out the pieces. You’ll need three pieces per shelf (two sides and one back).

Then, Kendall cut them using our circular saw. I was a good helper and held the ends still for him while he cut 😉 After cutting them, he sanded them down to make them nice and smooth. Since our shelves were MDF, they didn’t need to be sanded. But if you use plywood or pine for your shelves, you’ll probably want to sand those too.

3. Paint.

We wanted to give our linen closet a fresh coat of paint, so while I painted the closet walls, trim, and door, Kendall painted the ledges and shelves. It was chilly outside, so we laid down a drop cloth and used cardboard boxes to prop up the wood as we painted.

For some reason, we painted the first coat on the shelves with a paint brush, which took forever. I highly recommend using a paint roller instead. It’s so much faster!

We used a semigloss finish on the ledges and the shelves so they could be easily wiped down and cleaned.

4. Install the ledges.

Once you get two coats on the 1×2 in. ledges, it’s time to install them! These ledges will hold up the shelves, so it’s important to make sure you nail them into studs. We used a stud finder to locate the studs on the three walls where we would be nailing the ledges.

Next, start nailing! We nailed each piece in three spots: the ends and where the studs were. Kendall put several nails in each spot to make sure the shelves were very secure. He loved using a nail gun for this project since our closet is a smaller space and using a hammer would have been a little difficult, but you could definitely get this done with a hammer. Just make sure you are using finishing nails so you can patch the holes.

Use a level to make sure the back and side ledges line up properly. Otherwise, you might end up with wobbly shelves.

After you’ve installed all the ledges, it’s time to spackle the holes. After the spackle dries, sand it lightly or go over it with a wet cloth to smooth it down, then give it one more quick coat of paint.

5. Install the shelves.

Once you install all your ledges, your closet should look something like this:

Even though there are no shelves, this looks so much better already! The new coat of paint really freshened it up.

It took us a few days to get three coats of paint on the shelves, so once your shelves are dry, gently fit them into your closet. If you’re having trouble fitting the shelves into place, sand the ends a little more. With any luck, your finished product will look something like this:

6. Fill the shelves and spend an hour staring at the beautiful result.

Did I stare at my finished closet for an hour? Maybe not 😉 But I do keep opening the door and admiring the transformation when I walk down the hallway.

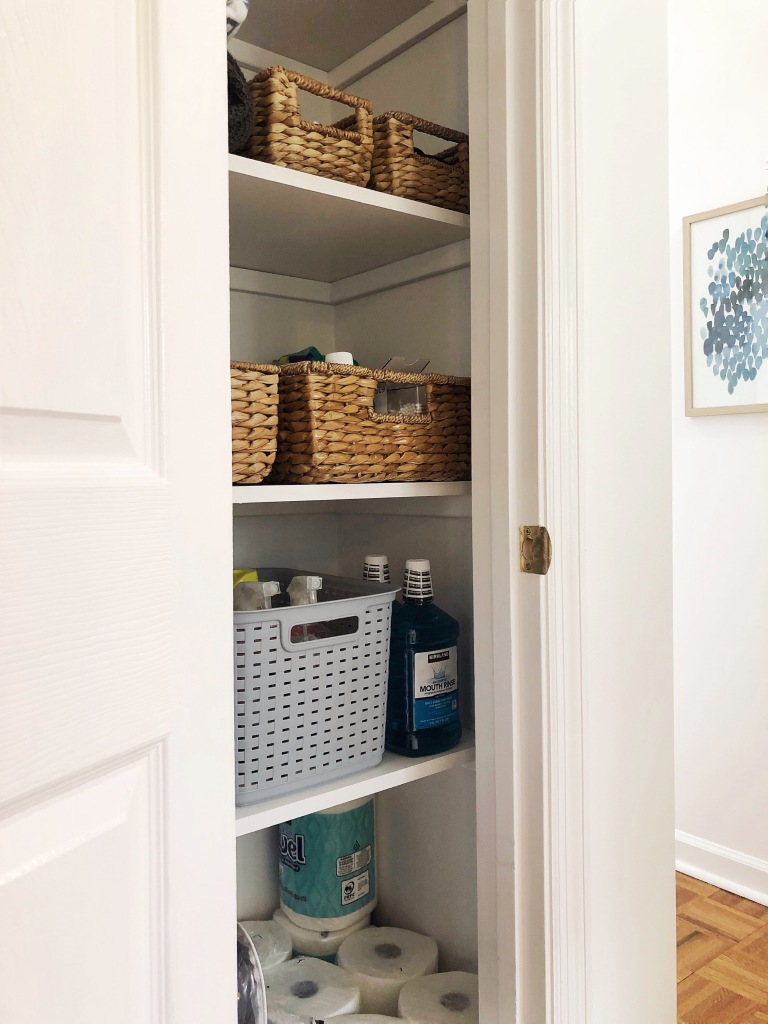
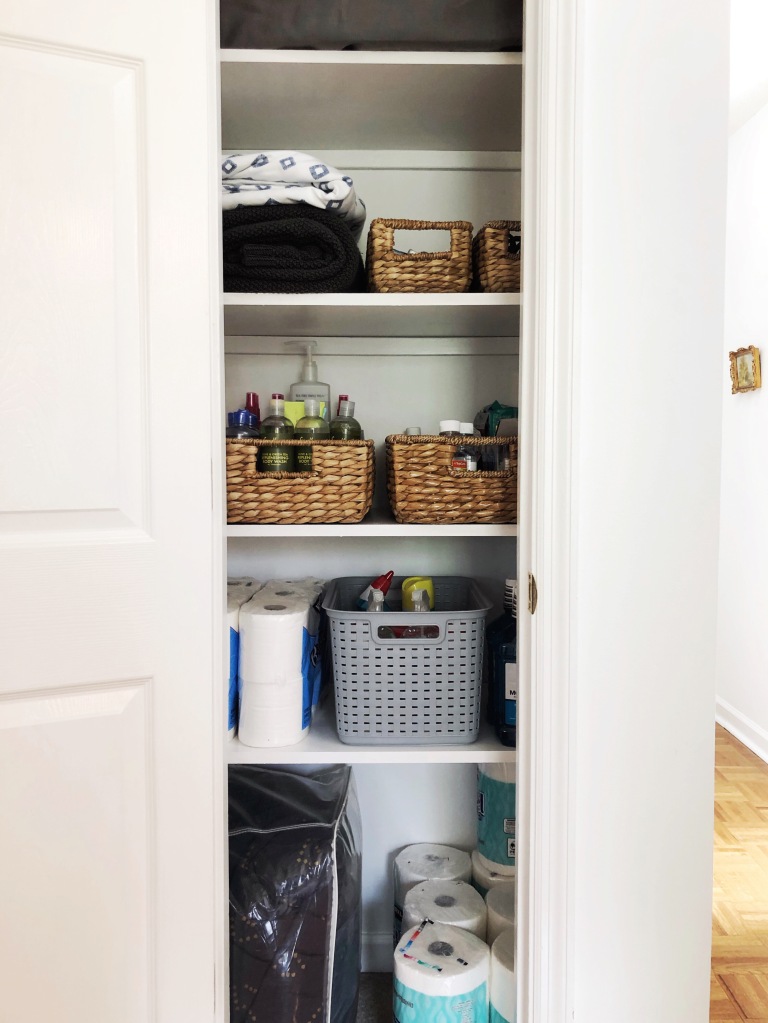
Although the shelves made this closet 100 times more functional, the real MVPs are the storage solutions. Thankfully, I already had some storage baskets and bins, but if you don’t have any, you can get them for very cheap at places like the Dollar Tree, IKEA, or Walmart. Target also has a newer line called Made by Design that has some affordable and stylish storage pieces.

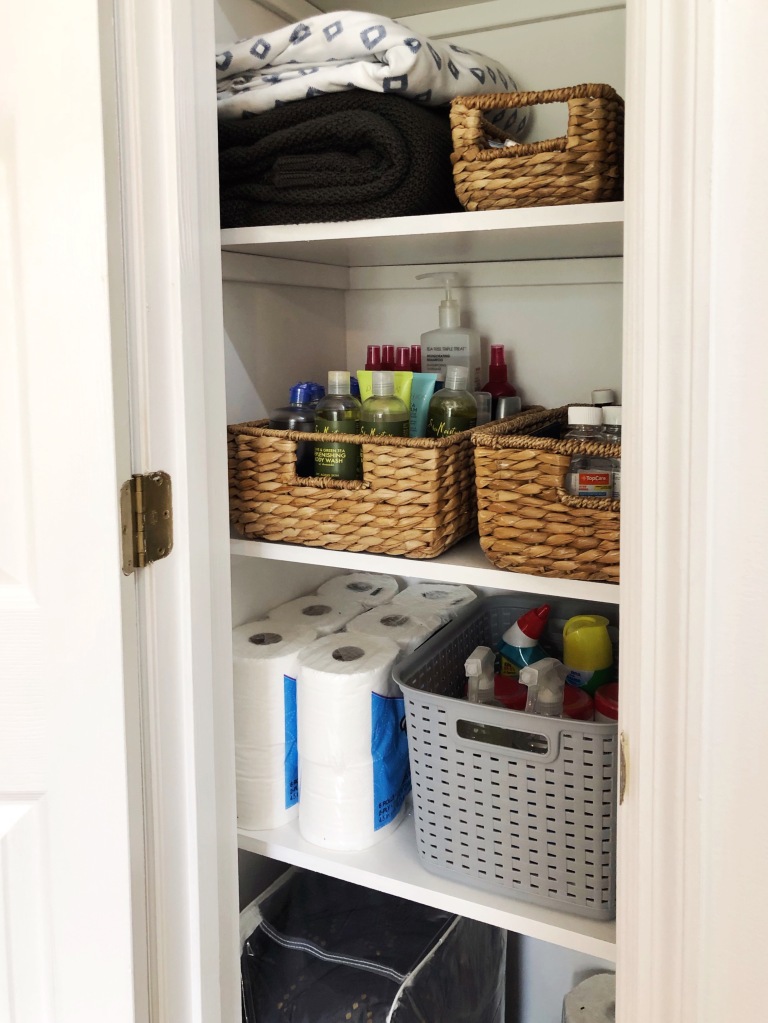
I sorted my items into several categories: dental items (floss, toothpaste, extra toothbrushes), medicines and bandaids, extra hygiene products (shampoos, soaps, deodorant, contact solution, etc.), extra cleaning supplies, and paper products. Then, I used the baskets and bins I already had to corral the items. This will keep things neat and tidy so we don’t have to dig around when we more shampoo or toothpaste.

I also already had a linen storage bag, and I highly recommend them! I can’t find the exact one I have, but this one looks nice. I use it to store extra blankets, seasonal throws, and other linens we don’t use often. The closed bag helps keep them fresh and organized, and I don’t have to have a haphazard stack of blankets precariously balanced on the top shelf.

And that’s how we transformed a wasted space in our home for just $50 and a few hours of spare time! I wanted to leave you with one last photo of a of the before and after side-by-side comparison…

Thanks for following along on Instagram! You were all so supportive, and I think some of you were just as excited as I was with the finished product 🙂 Feel free to ask any questions!

Have you worked on any projects during the COVID-19 quarantine? How are you keeping busy during these strange times? Let me know in the comments!

8 Tips for Shopping at Estate Sales

Disclaimer: I live in Tennessee and based a lot of this information on how estate sales are in the Southeast.  Your experience could be different in another part of the country, but I still think there is some good information here that you could apply!

The more I’ve shared my estate sale finds on Instagram, the more I’ve discovered that estate sale shopping is not a prevalent part of the larger thrifting community.  I see famous Instagram influencers and designers shopping at thrift stores, antique stores, and flea markets, which has made this kind of shopping almost mainstream, and I love it!  However, I don’t see any of these high-profile accounts ever stopping by estate sales, and I think they’re really missing out 😉 So today, I want to go over some basic information, debunk some myths, and give some tips for how to successfully shop at estate sales.

First of all, what is an estate sale?  According to EstateSales.Net, “An estate sale (also called a tag sale in some parts of the country) is a way of liquidating the belongings of a family or estate.”  Generally, these sales are held in the actual house where the belongings resided, which means there is SO much more than you’d find at a garage or yard sale.  These sales usually occur when an elderly person or couple is downsizing or moving to assisted living, although sometimes they are held when someone passes away.  I have also been to sales where the family was simply moving and wanted to start completely fresh in the new home.  

If the estate belongs to an elderly person/couple who is downsizing/moving to assisted living/has passed away, here is typically what happens. The family will go through the items and take what they want.  However, there is often so much left that the family does not want or have room for that the family will opt to hold an estate sale. The family might choose to run it themselves, but many choose to hire an estate sale company. The estate sale company will go through the remaining items in the house and appraise them, then offer the family a lump sum for the entire contents of the house.  Then, the company will hold a sale in the house to try to make money on the items they purchased. 

Now that we’ve established what an estate sale is, let’s debunk some myths and misunderstandings about estate sales.

Estate Sale Myths

Myth #1: It’s all grandpa sweaters and cat figurines.

Estate sales are great places to find affordable and quality furniture. I found these amazing caned chairs for only $24 (for both!).

Think of an estate sale as a cross between an antique store and a thrift store.  It’s true that not all estate sales have great, quality pieces. However, today’s elderly people are from a generation in which quality pieces were much easier and more affordable to obtain than they are in today’s IKEA-dominated culture.  You’re much more likely to find an amazing vintage piece at an estate sale than you are at a thrift store, and the price will almost certainly be cheaper than an antique store.  

If your style is 100% modern, then I don’t think estate sales are for you.  But if you love the curated and layered style used by famous designers such as Emily Henderson, Amber Interiors, and Studio McGee, you can easily add more character and texture to your home by mixing in antique and vintage pieces with your newer items.  You will find great pieces if you are willing to search!

Myth #2: It’s all furniture or large items.

I mostly find smaller items at estate sales, like this tiny oil painting I got for just 50 cents.

Fact: I have only purchased furniture at an estate sale once, and it was recently two dining chairs and a small pedestal table).  All of my other finds have been smaller things such as textiles (blankets, towels, table cloths), kitchen items (utensils, baking items, crocks), art, and tchotchkes (vases, frames, and other small items).  Since—in most cases—every item in the house is for sale, there is usually an abundance of smaller items to hunt for. Things as seemingly ridiculous as cleaning supplies and opened printer paper are up for grabs.  If it’s not nailed down, it’s for sale. It’s true that estate sales are stereotypically amazing places to find larger pieces, but I strongly encourage you not to rule them out for smaller items!

Myth #3: It’s too expensive.

These alabaster bookends were just $4.

In my experience, estate sales are cheaper than antique stores.  I often hear Instagram influencers say they’re going “thrifting,” when they are just going to an antique store.  I guess they’re not wrong, but to me, “thrifting” means cheap! And, at least in my area, estate sales are cheap.  I often see antique dealers at estate sales sourcing for their shops or booths. Don’t come expecting thrift store prices on very nice furniture, but do expect to get a great deal, especially compared with buying new, quality items.  You can’t always expect to find quality items at IKEA price levels, but it’s definitely possible! 

Myth #4: Someone died and no one wanted their stuff.

I didn’t purchase this amazing vintage sofa, but I spotted this an estate sale this month. The home was filled with so many beautiful pieces, that the children of the family just hadn’t had room for it all.

Although most estate sales I’ve gone to were simply an elderly person/couple downsizing before moving to assisted living, it is true that sometimes the sale is held because an elderly person has passed away.  I assume that the deceased’s family goes through the house and takes what they want, but that doesn’t mean what’s left over is just junk. Likely, the family members don’t need or have room for everything that is left.  If the remaining items are of good quality, the family often decides to have an estate sale instead of donating the items to a thrift store to make some money on the nice things that no one was able to take. 

Estate Sale Shopping Tips

1. How do you find estate sales in your area?

My favorite way to find estate sales is an app and website called EstateSales.Net.  You enter your zip code or city, and the map will show you all the estate sales near you.  It will also show you the company that’s running the estate sale and any description that the company wants to add (usually a list of the types of items for sale or instructions on where to park).  The best part? THERE ARE PHOTOS! That’s right, you can preview the sale before you even decide to go!  More about that in #2.

The EstateSales.Net map will show you all the sales within a certain radius of the area you entered. You can tap on the blue icons to get information about the sale and see the photos.

2. How do you know if the sale will have things that match your style?

I always check the photos in the EstateSales.Net listing.  These photos are usually not that great, but it always helps me get a sense of what I might find at the sale.  My husband and I like to go together, so if the sale has a lot of tools or a very disorganized garage that my husband can dig through, we always try to go 😉  I also look for classic furniture. If all the furniture is 90s-style orange oak, it’s unlikely that there will also be beautiful mid-century or antique pieces.  Also, I think the sales that look unorganized or totally packed in the photos tend to be the best ones. Sometimes, the photos will look kind of bare. Usually, this means the sale won’t be very exciting.  I like to dig, and if it looks like there is very little for sale, I usually pass.

I went through a few EstateSale.Net listings and found a good example of what I’m talking about. In the first photo, I can easily see that there will be a lot of neat items to browse. There’s antique furniture, art on the walls, a really nice rug (which means there could me more rugs elsewhere), and some blue and white jars and decor. Most of the other photos in the listing looked just as promising.

Now take a look at the second photo. There is barely anything in the photo, and the items shown don’t look very exciting. The chair looks very 90s, and the other photos showed mostly similar furniture. Based on the photos, I could tell this one wouldn’t be very exciting.

ALSO…  I never find a sale that matches my style 100%.  In fact, most of the items generally aren’t my style at all.  The key is to use your imagination and have a vision. A gorgeous caned dining chair might look totally Grandma at the estate sale when paired with a dated dining table; however, if you imagine it in your home with your more modern table, you might find that it has potential! 

3. When is the best time of the day/week to go?

Most estate sales are held on the weekends.  In my area, the sale usually starts on Friday and ends Saturday.  However, sometimes sales go through Sunday. Just check the listing on EstateSales.Net to find out when the sale is being held.  Usually, everything is 50% off on the last day. This is my favorite time to go because I’m always looking for deals deals deals.  However, if you’re wanting something specific that you saw in the photos, I would go as early as possible.  

4. If you don’t have anything specific you’re looking for, how do you decide what to buy?

Treat an estate sale like going to the thrift store.  You likely don’t always have an exact list of things you want or need, but that doesn’t keep you from going often.  Frequency is basically the key to discovering treasure! Often, I go in with no expectations, and then I see something like a food canister and think, “Just the other day I was wishing I had a canister for pasta.”  Or, I’ll see a piece of art and think, “That is exactly the size of art I needed for the guest room.” Just keep an open mind, and if you see something that catches your eye, envision where you’ll put it before you purchase it.

5. Do you go to estate sales looking for something specific or just to treasure hunt? Do you usually go in with a plan?

I mostly go just to treasure hunt, but I am always looking for a few things: original art, studio pottery, vintage rugs, storage items, vintage skirts, and books.  I know it’s kind of a random list, but these are things I see and find frequently at estate sales.  My plan is just to enjoy looking at neat pieces 🙂 I would be lying if I didn’t admit that it’s also really fun just to go into different houses and look around, haha.

6. How can you tell which ones are worth going to?

Sometimes you really can’t tell.  I recommend going to several in your area at first.  This will give you a good feel for the neighborhood. I think estate sales that are held in small retirement communities (where the person has already downsized once) are usually not very good, so I tend to skip those if I drive by an estate sale sign.  Also, like I said in #2, check out the photos online before you go!

7. How do you know where to find a good estate sale?

I think location has very little to do with the kind of estate sale you should expect!  I have been to amazing estate sales in “bad” parts of town and terrible estate sales in expensive parts of town.  I’ll say it again: look at the photos before you go! 🙂

8. Do higher-end areas of town have better estate sales, or are they too expensive?

Since most estate sales are run by companies, I think the companies are usually consistent with their pricing.  However, this might not be true in all areas. Also, companies tend to price items higher if they are worth more.  So, if the expensive area of your town has higher estate sale prices, it might just be because the items for sale are worth more.  However, I haven’t experienced this personally. In fact, I usually find the selection in expensive zip codes to be much worse. I’m not sure why.  I recommend paying attention to the company running the sale. You might find that a certain company in your area always over prices things, and since you can see the company ahead of time on the EstateSale.Net listing, you can easily skip those.

Well, this turned into a much longer post that I’d expected! I hope this answers some of the questions you all asked me on Instagram. Feel free to leave more questions in the comments! xo Lizzie

How to Read More and My 2020 Reading Goals

I recently shared on Instagram that my reading goal last year was to read 75 books. This garnered some curious inquiries on how I manage to read that many books in one year. Since reading is something I am passionate about, I thought I’d share some of my suggestions here, as well as make a strong argument for why you should add reading of some kind to your 2020 goals (or resolutions, or intentions, or whatever it’s trendy to call them now).

How to Read More This Year

It feels like we are all so incredibly busy nowadays. I just told a friend that I feel like I haven’t had a free weekend since we bought our house in July. Last year, Kendall got a new job, we bought a house, I got a new job (that changed my workweek from 4 days to 5), and we celebrated our first wedding anniversary. If I could use one word to describe 2019, it would be BUSY.

However, I still managed to make time for reading by being intentional with my time. I didn’t do anything ground breaking, and I’m sure my tips aren’t something no one has ever thought of before. But, I thought I’d gather my suggestions into one list in case any dutiful readers want a few fresh ideas for reading even more, or maybe some wannabe or newer readers need some help knowing where to start. Here are a few things you can do to drastically increase the amount of time you have to read.

  • Use Goodreads to create a Reading Challenge.  You’ll be able to track your progress, and it is very satisfying!  Plus, you can also create “shelves” (lists) of books you want to read and get great book recommendations.
  • Consider the library your friend!  Put everything on hold. If you love a book and decide you want to own it, you can always buy it later.
  • Carry a book with you in your bag.  Read on your lunch break, on public transit, while you’re waiting to meet up with friends, while you’re in line at Costco waiting to pump gas (lol).  You’d be surprised how much time you spend waiting (hint: you probably spend that time on your phone and just don’t realize it).
  • Listen to audiobooks (for free!).  Download Overdrive or Libby and log in with your library card information.  Now you have instant access to your library’s audiobooks (and ebooks!).  You can listen during your commute, while you’re getting ready in the morning, while you’re doing chores, etc.  It’s an amazing way to increase the number of books you read in a year. (Half of the books I read in 2019 were audiobooks!)
  • Always be reading one physical book and listening to one audiobook. Trust me… you can read more than one book at a time, easy.
  • Stop spending so much time on your phone or watching Netflix.  #justsayin
  • Try to finish every book. It can be tempting to stop reading a book you aren’t really into, but unless it’s unbearably dry, try to power through to the end.
  • Keep a journal with some thoughts about what you’re reading.  Even if it’s just a Google Doc with a few sporadic thoughts, it’ll help you hone your analytical skills and make you a more mindful reader. You might even start to enjoy it!

Why Read More?

Did you know that reading has been proven to be good for you on multiple levels?  According to a study conducted at the University of Toronto, participants who read fiction had less need for “cognitive closure,” meaning they were more open-minded than participants who only read non-fiction essays.  A study conducted at Yale concluded that participants who read 30 minutes a day live longer on average than those who do not.

Besides health advantages, reading is also enjoyable and an excellent way to learn about human nature or the world. Reading challenges you, inspires you, reduces your stress, teaches you about other cultures or periods of history, and improves your focus (something that is slowly disappearing in a world of screens). And, it doesn’t have to take up much of your time. You can pick it up and put it down easily.

My 2020 Reading Goals

So, what are my reading goals for this year?

  • Read 50 books (I’m focusing on quality over quantity this year)
  • Read 5 nonfiction books
  • Reduce my physical to-read pile by half (right now, it’s about two boxes of books, haha)
  • Read Bleak House by Charles Dickens and Middlemarch by George Eliot (two thick classics that I have been putting off for a while)
  • Devote one day a week to a deeper Bible study than my quicker daily readings

In 2019, I read a lot of books that I didn’t love, I think partially because I felt like I always needed to be reading something to meet my goal. This year, I want to make sure I am more intentional about the books I choose.

Well, I hope there are at least one or two ideas that you can use to start reading more.  It’s never too late to start reading, and it won’t take you long to create a healthy habit!  Good luck!

And if you don’t already, follow me on Goodreads to see what I’m reading, which books I liked, which books I didn’t like, and an occasional book review 🙂

What are your 2020 reading goals? What books are on your to-read list?

How I Picked a Color Palette for Our Home

Well, so much for trying to write one or two blog posts a month 😬 As some of you already know, I started a new job in October, and I’ve had a lot less free time. This post alone took me weeks to throw together in 10-minute increments. I’m not giving up though! Kendall and I have tackled several house projects since September, and I’m looking forward to writing about them, too (eventually 😉).

In my last post (four months ago…), I mentioned that I created a color palette for our house, and I wanted to explain how (and why) I did this.

What I Did and Why

After we made an offer on our house, I started planning the colors we’d use in pretty much every room.  I combed through my Pinterest boards and created a new board for every room in the house. My goal was to collect inspiration and create a general color palette that I would use throughout all the rooms in our house.  I wanted each room to flow naturally into the next one, creating a cohesive and calming space. I also wanted to be able to easily move decor around from room to room, since I love to “shop my house” and swap out different pieces.  

After I created my Pinterest boards, I started to notice that my tastes leaned toward either light, airy rooms with natural or neutral colors (like olive, camel, grey, and blush) or deep, moody rooms with darker colors (like navy, hunter green, and teal)…  Pretty much two opposite ends of the spectrum. This confused and annoyed me. I didn’t really know where to start.

Then, I remembered the age-old design trick that recommends picking a color palette based on an inspiration piece.  I realized immediately that I already had one—my living room rug!

I purchased this rug in a 9×12 on Way Day last year for just under $200, and it’s probably one of the best things I’ve ever bought for our home! The size really pulls the room together, and the colors bring a lot of warmth. The stock photo doesn’t do the rug justice, so here are a few styled photos to help you get a better idea of the color:

(Source)

(Source)

(Source)

In the stock photo, the prevailing color appears to be a terracotta shade, but in person, it actually has much more depth.  The middle portion is a beautiful dark blue/teal, and the trim a lot of colors, like sage, blue, pink, and peach.

If picking a few colors from this rug and using only those colors throughout the house sounds too restricting to you, let me put you at ease.  My goal is not to pick five colors from this rug and only use those in every room.  Instead, my goal is to make sure any color I choose goes with at least one (but hopefully more) of the colors in this rug, regardless of the room it’s in.  

I can create sooo many color palettes from this one rug.  Here are a few examples below:

See how no matter which way you look at it (horizontally, vertically, diagonally) the colors all seem to create a cohesive color palette?  That gives me a huge number of options for every room in my house!  

When I implement these colors, my first focus will be choosing colors for permanent things like walls, cabinets, or tile.  Then, I’ll choose accent pieces like curtains, decor items, art, rugs, and throw pillows. I personally try to keep my furniture pieces on the neutral side, but don’t feel like you have to!  A sofa or chair in one of the brighter colors would definitely be a beautiful statement piece.

How to Make a Color Palette

If you need a little help making a color palette of your own, here’s the process I use to create one:

  1. On Pintrest, create a mood board of several photos you like that look cohesive together and match your inspiration piece.
  2. Save each photo to your desktop.
  3. Go to a site that will generate a color palette from an uploaded photo.  (CSS Drive is the best, IMO.  It will give you lots of color options instead of just 4–5.)
  4. If necessary, crop the photo to a portion that has the colors you’re looking for (this will help prevent random colors from showing up in your palette).  See my example below:

Cropping out the rug (which brought in too many browns) and the tree (which added a random bright green) helped create a more accurate palette.

Or, use an app like PicMonkey to create your palette.  They have a really nice tutorial here.

How to Find an Inspiration Piece
Finding an inspiration piece is probably this trickiest part of the whole process. To give you a few ideas, I rounded up nine pieces that I think could inspire beautiful color palettes for a home!

1. Purple and Pink Dark Floral Wall Mural | 2. Leopard Walk Charcoal and Orange Wallpaper | 3. Mountain Meadow Removable Wallpaper | 4. Langdon Hand-Knotted Rug | 5. Silver Florid Dreams Rug | 6. Gracewood Hollow Lapointe Medallion Border Rug | 7. Abstract Shapes | 8. Looming Clouds Framed Canvas | 9. Mid-Century Color Block Art

I hope this was helpful!  This is by no means an official method, but it did work really well for me.  Please ask me any questions if you try to replicate the process and get stuck!

Do you have a color palette in your home?  If so, how did you create it?

Hall Bathroom Plans + Design

We have been living in our house now for just over one month!  We are mostly settled in, and the longer we live here, the more it feels like home.  

And the more our project list grows 😉

If you follow me on Instagram, you might have seen that we started our first room makeover this weekend!  We’ve decided to start with our least expensive room since this is our first real project. We’re taking a page from Young House Love and doing a Phase 1 renovation.  (Check out YHL’s great post about Phase 1 projects if you don’t know what I’m talking about.)  Since we don’t want to spend a lot of money and gut the entire room, we’ll mostly be making cosmetic changes so we don’t have to live with a really ugly bathroom for 3+ years.  Let’s take a look at what we currently have going on, shall we?

The Situation

Not pretty, right?  Like I mentioned in my home tour post, it’s a pretty tiny space, but overall, I like the layout of this bathroom.  It’s small, but practical. The vanity is large enough for a guest to put their toiletries on the counter, and there is a shower/tub combo.  Since this room won’t be getting daily use, we are going to make mostly cosmetic changes and put more money toward our master bathroom when we renovate it (one day).  

The Plan

Before we’d even moved in, we knew pretty much what we wanted to do with this space.  We wanted to paint the vanity and replace the light fixture and the mirror (goodbye, hot-glue-gone-wrong mirror).  We wanted to take the shutters off the window and install another privacy solution for the space. We wanted to update all the fixtures.  

Nothing too complicated or expensive.  

Originally, I wanted to paint the walls or the vanity a warm, dark green, like this:

(Source)

(Source)

However, the paint chips I’d picked up from Home Depot didn’t look good with the tan/grey linoleum floors.  If we went with a darker green, we would need to paint or replace the floors. We could have made room in our budget to replace the floors, but we didn’t want to if we didn’t have to.  Painting the floors was an option too, but we weren’t thrilled about the idea.  

Luckily, I saw Jenny Komenda’s Evergreen House Kitchen.  She used a beautiful sage green color on the kitchen cabinets, and the floor tiles are–you guessed it–tan and grey.  The sage color looks amazing with the mixed tones of her flooring. So, even though her floor was very cute and ours was not, I was able to visualize the sage color in the space with tan/grey flooring.  

(Source)

Sage was also a better choice because it fit into the overall color palette of our house much better.  (Post coming soon about how I chose our color palette!) A darker green would have felt disconnected from the color palette I’ve chosen.  

Kendall wasn’t hard to convince, so we ran to Home Depot and picked up a quart of Sage Wisdom by Behr.  We’ve already got a few coats on the vanity, and I can confidently say it was the right choice for sure!  It’s not too pastel and not too green. It’s a beautifully subtle color that will transition well if our tastes change.  

Sage Wisdom by Behr

The color looked great with all the other elements I had picked out in my head…

The Design

I created a quick moodboard to help myself visualize the space. Here’s my final draft. Fun, right?  I love the soft, earthy look it has.  I also love that we don’t have to replace the floors!  Finding ways to work with what you have is such a financially smart decision.  I’m so glad we’re saving around $300 and putting it toward our upcoming master bathroom renovation.

I’ve decided to mix my finishes in this bathroom.  It’s really trendy right now, and I love the way it looks.  However, I think I’ll be too scared to try it in my kitchen or master bathroom, so I wanted to get it out of my system in the hall bathroom.  I’m mixing black and brass, and I think the end result is going to be amazing.

As with every project we’ll take on in this house, budget plays a huge role.  Most of the money in our budget is going toward new fixtures for the sink and shower.  Amazon offers a lot of cute, cheap fixtures, but a lot of the customer reviews are mixed.  Lots of good ones, and lots of bad ones. We decided to spend a little extra money and go with Delta fixtures because we know Delta is a trusted brand.  We were just too nervous to skimp on something as serious as plumbing. So, we’re scouring places like eBay to make sure we get the best price. (I totally recommend installing a Chrome plugin that will search for the best price for you.  We used Wikibuy from Capital One, and it seriously saved us hundreds of dollars and a lot of time!)

We’ve already started painting the vanity and patching the giant hole where the old light fixture was, and I’m really excited to share the final results with you soon!  

10 Things We Accomplished at Our House in One Month

As of Monday, we have owned our house for one whole month (and lived here for three weeks)!  As I was making a list of all the projects we’ve done since closing, I felt a little proud of all the hard work we’ve done.  So, I thought it would be fun to share little snippets of the progress we’ve made in just one short month! (These are just quick iPhone snapshots, so I apologize for the quality.)

Let’s get started.

1. Painted all the rooms (except the bathrooms)

I’ll start with the highest-impact item.  Like I mentioned in the “before” empty house tour, the colors in this house were BOLD (and also not our style).  We knew we didn’t want to live with red, yellow, chocolate brown, and dark green walls for any length of time, so we decided to delay moving for one week to give us time to paint.  This was honestly such a smart decision for us. With the help of our family and friends, we were able to paint all three bedrooms; the living room, dining room, and kitchen; and the hallways.  It was A LOT of work, but it felt so good to move in and unpack immediately instead of leaving everything in boxes until we painted.  Painting first helped us settle in quickly.

I feel lame not sharing any photos yet, but things are still a little crazy over here. Soon! 🙂

2. CLEANED EVERYTHING

While some were painting, others were helping us clean.  As for the state of the house before we moved in… Let’s just say cleaning was not a priority for the the previous occupants.  I recognize that I am a clean freak and that not everyone cleans as much as me, but I think most people would have been surprised by how dirty our house was.  If we had waited to clean until after we moved in, cleaning would have become so much harder. Just like painting, cleaning prior to moving allowed us to unpack and settle in quickly.  

3. Unpacked everything

On Day 1, we were 80% unpacked.  Can you believe it? It only took us a few hours to move, so we had most of the afternoon to unpack.  Plus, our family was really helpful. Because everything was already painted and clean, they were able to help us get the furniture in place, our clothes in the closet, and all of our kitchen items unboxed and put away.  As for the remaining 20%, we took care of it over about two weeks. So, we were totally unpacked in less than three weeks. That’s a huge accomplishment in my book!

4. Replaced the entryway light fixture

Now I get to talk about the fun stuff!  One of the first things we did aesthetically (besides painting) was replace the entryway light fixture.  The existing one was essentially just a “fancy” dust catcher, plus it felt too large for the space. We replaced it with a really simple (and affordable) pendant light that is much less flashy.  It fits the scale of the space much better.

5. Replaced hallway light fixtures

In our house, the master bedroom is separated from the other bedrooms by the living room, dining room, and kitchen.  This means we have two short hallways–one on each end of the house. Both had dated mushroom lights that really made the space feel drab.  After a lot of research and investigation, we finally found an adorable light that fit our budget. My goal was to find something updated but not too modern, and I think this light fits that description perfectly.  We are using these amazing LED Edison-style bulbs, and they provide so much light!  Plus, they are also super affordable and last for 13 years.  Not too shabby.

6. Replaced all the outlets and light switches

During our home inspection, we discovered that not all our outlets were up to code.  We were missing a few GFCI receptacles. However, we knew this would be a simple fix for us since Kendall’s dad is handy with wiring.  After we closed on the house, we realized that the previous owners had mismatched outlet and light switch covers all over the house. They weren’t even consistent in the same room!  Plus, they had accidentally painted over a lot of the plus and light switches, making them look pretty awful. We decided that since we were wanting to replace all the outlet and switch covers to make them uniform, we might as well replace the actual outlets and switches too.  The old switches and outlets were yellowed, and we wanted white so they wouldn’t clash with our freshly painted white walls. So, we have been replacing all the outlets and switches a few at a time since we moved in. They look so much better.  Having mismatched switch and outlet plates was really jarring to the space.  

Mismatched cover plates.
Painted over outlet.

7. Replaced hall bathroom mirror and towel rod

We haven’t painted this bathroom yet, so I was hesitant to show anything.  But, I decided any small progress was worthy of sharing. As you may remember, the mirror in this bathroom was a hot glue DIY gone wrong.  Someone had hot glued tiny tiles around the mirror (except they left holes where the mirror screws and some of the corners were). We tried prying them off, but it left glue on the glass.  Luckily, we had planned to replace the mirror eventually anyway, and I happened to already have one that would work! We hung this round, gold framed mirror in its place, and I think it looks so much better. 

(Please ignore the half-painted wall, haha.)

We also hung a hand towel rod, since the owners had apparently taken it with them when they moved, for some reason. I chose this modern black one, and I love how it looks with the gold. I’ve decided to mix brass and black finishes in this bathroom so I can get it out of my system, haha.  I think I will keep our master bathroom just brass. Speaking of…

8. Replaced master bathroom toilet, towel rod, and toilet paper holder

I wish I had taken a photo of the old toilet before we replaced it, because the comparison between the old and the new is striking.  (Okay, maybe I’m the only one who thinks that, haha.) The old toilet in our master bathroom was a dated almond color and also so dirty.  No matter how hard we scrubbed, we couldn’t get the stains out.  Plus, the handle was wonky and had to be held down for longer than normal for the toilet to flush.  After a week of living with an annoying toilet, we decided it was worth the money for a new toilet. We’d known we would have to replace it soon regardless, since our home inspection had revealed that it was leaking.  So, Kendall watched some YouTube videos, and we went to Lowe’s to get a new toilet! We had planned to get one of the cheapest ones, but then I saw this one… It has smooth sides for easy cleaning! It didn’t take long for me to realize it was worth the extra $60.  So far, I have not regretted our decision at all. I am so much more comfortable in a space that I know is clean, and cleaning the awkward shape of the toilet has always been annoying to me since I’m never entirely convinced I got every nook and cranny.  Plus, let’s be honest… Isn’t this new one just aesthetically pleasing? Lol. It’s about four inches thinner than the old one, so you can see where the owners painted around the toilet like, four times, haha.  

We also replaced the hand towel bar and added a toilet paper holder (there wasn’t one for some reason).  Both were very affordable on Amazon, and they are super high quality, IMO.  

9. Replaced all the smoke/CO detectors

I know this one isn’t fun, but it is really important.  When we moved in, there were around 7 smoke and carbon monoxide detectors in the house.  Every single one of them was original to the house and was therefore expired. Every. Single.  One. None of the battery-powered ones had working batteries. Some were hardwired, but even a hardwired smoke detector needs replaced every 10 years.  I don’t know how the previous owners slept soundly at night! The water heater, stove/oven, and heat are all powered by gas, so it was even more important to have a CO detector.  We replaced all of ours with detectors that integrate with each other, which means if one goes off in the office, they will all go off. It’s a nice safety feature!  

10. Hung the TV over the fireplace 

Let me preface this one by saying I did not want a TV over the fireplace.  I had imagined hanging a beautiful piece of art over the mantel and styling it with candlesticks and vases.  I would rather not have a TV than give up my lovely mantel. I am perfectly contented to watch TV on my laptop for the rest of my life, haha.  However, I wasn’t able to convince Kendall we could live without a TV, especially since the previous owners left us one for free (they had at least three, and I guess decided they didn’t need them all).  Due to the layout of the room, the only place we could put the TV was right over the mantel. Sad day. But, Kendall loves me very much, because he worked very hard to make sure there wouldn’t be a mess of wires.  With some help from my brother, Kendall crawled around the in attic and behind the fireplace to add an outlet above the mantel. It looks pretty good, for a TV above a fireplace 😛  

That wraps up what we’ve accomplished in the one month we’ve owned our house!  We’re going to start Phase I renovations soon, starting with our hall bathroom.  We are so excited to get started! More details coming soon 🙂  

Oh, one more thing! I just created a guide for how to create a cohesive and curated thrifted wardrobe. I’m so thrilled to finally share it! Just click here to download! 🙂 Enjoy!

Xo Lizzie

What are some projects you knocked out the last time you moved?  Which ones do you feel like always have the biggest impact? Let me know in the comments! 

My Top 10 Thrifted Finds of All Time

In honor of National Thrift Shop Day, I thought it would be fun to share my top 10 thrifted finds of all time. I’ve been a serious thrifter for about seven years, so I’ve had a lot of time to dig up some gems! Before we get started, I want to mention that I have found way more thrifted clothes than what I’m sharing, but I’m not really a fashion blogger, so I’m mostly focusing on furniture and decor pieces today.

1. Mid-Century Modern Glass Front Cabinet, $50

I probably gasped out loud when I saw this beauty in Goodwill three years ago. The thrift stores I frequent rarely have decent furniture, let alone a beautiful MCM piece. The brass-capped feet were not in great shape, and the finish was looking rough, but the sliding glass doors were in amazing condition! I almost left it behind because it was $50, but I’m so glad I didn’t. Here’s how I have had it styled most recently.

(Also thrifted: the frame, small plant stand, pottery vase, and most of the books. I found the lamp shade next to a dumpster!)

2. Copper Kettle, $3

I am a sucker for vintage kitchen items, especially if they are copper. This adorable kettle immediately caught my eye with its aged patina and its blue and white porcelain handle and lid. I cannot wait to put up some open shelves in our new kitchen so I can display this piece!

(Also thrifted: the adorable Starbucks mug!)

3. Farmhouse Dining Table, $10

(Technically, this find is from a yard sale, but I felt like it still fits with the spirit of National Thrift Shop Day.) You’re probably looking at that picture and thinking, “That looks nothing like a farmhouse table.” And you’re totally right. This orange Spanish-style set was even more orange in person, if you can believe it. But, I could see that the table had great bones. There was beautiful ironwork detail on the legs, and I really liked the X pattern on the top.

So, I purchased the set for $40, then sold the chairs on Craigslist for $30 the next week. Kendall helped me sand and stain it, and the end result is great!

4. Lucky Brand Leather Ankle Booties, $4

Ankle booties are a dime a dozen at thrift stores nowadays. The trend has been going strong for around 8 years, so there are plenty available second hand. However, I was holding out for a pair of genuine leather booties with a short heel, and my patience eventually paid off. I scored these for just $4 at Goodwill, and I’m so glad I didn’t cave and pay $40 or more!

5. Mid-Century Modern Credenza, $50

This poor credenza was in a sorry state when I first got my hands on it. The trim had been ripped off the front edge, one of the legs had cracked, and someone had sanded and painted all six of the drawers an assortment of random colors. It was definitely a sad sight! I’m not the handiest person around, and I knew I couldn’t sand it down and refinish it (at the time, I was living in an apartment and had no power tools), but I did think I could save it with a coat of paint. Here’s how it turned out.

Can you believe that’s the same cabinet? The transformation astounds me every time! With some help from my mom, we filled the dents and cracks, painted it, and replaced the trim on the front. We also did our best to repair the broken leg. It’s not perfect, but I don’t mind. I picked up some gold drawer pulls for a few dollars at Lowe’s, and they provided the perfect finishing touch.

(Also thrifted: the seaglass vase, basket, and all the art/frames.)

6. Camel Peacoat, $6

A tan or camel peacoat is another item I had on my radar for a while, but I couldn’t bring myself to spend even $20 since I already had a winter coat that I loved. However, I got really lucky and found one at Goodwill this spring! It was half off $12, so I finally added a camel coat to my wardrobe for just $6. It’s incredibly soft, and it’s big enough to wear over even the thickest of my sweaters. I can’t wait for some cooler weather so I can wear it!

7. Mid-Century Modern Magazine Rack, $4

If you follow me on Instagram, you might remember the funny story associated with this one. I found a MCM Hollywood Regency-style magazine rack at an estate sale for $10, but I passed on it because I wasn’t in the mood to pay that much for something that was a little beat up. After I got home, I began to regret that I hadn’t gotten it, but it was too late. (Thrift regret, anyone?) However, I found one at Goodwill just two weeks later!!! And it was in better condition, too. You’d better believe I snatched it off the shelf and didn’t let it out of my sight until I’d paid for it. It’s supposed to be a magazine rack, but I discovered it’s the perfect size for holding my vinyl collection. I love the glam it adds to our bedroom!

(Fun fact: One week later, I FOUND ANOTHER ONE!!! I don’t know if the thrift gods were messing with me or what, but I’m here for it.)

8. Nate Berkus Bedding, $6

One of my favorite Target brands is Nate Berkus’s eponymous line. His designs are always to modern and simplistic. However, they are also usually pricey, so I generally just admire from afar. I got really excited when I found this comforter + sham set at Goodwill for just $6! It was originally $12, but it was the color of the day and half off. It was in relatively good shape, so it came home with me.

(We aren’t currently using it on our bed, so please pardon the old photo with crooked art and lampshade, haha.) I’m planning to use it in our guest room once we get a full-size bed in there. I love the moody charcoal color!

(Also thrifted: the tan and grey geometric down pillow.)

9. Antique Oil Painting, $20

Hands down, this is my favorite find of all time. I love this painting. I got it at the Habitat for Humanity ReStore for a steal. It had some white marks on it (you can kind of see them on the right), so they had priced it fairly low for how large a piece it is. I almost didn’t get it because it was a lot of money for a college student, but I’m so glad I did. One of my mom’s friends is a painter, and she offered to repair the white marks for me! She did a great job, and you can’t even tell it was repaired.

The painting is signed, and after some intense research, I discovered that the painter was an Italian man who did most of his work in the 1870s. Another of his paintings (which was also of fishing boats) sold for $300 on an art auction site. So, I guess you could say I scored big!

(Fun fact: After I bought it, I posted a photo of it on Instagram and tagged my local ReStore. A few days later, they sent me a DM saying I had won a drawing for a free $25 ReStore gift card! I had inadvertently entered the drawing by posting about my purchase on social media. So, ReStore technically gave me $5 for buying the painting, haha.)

(Also thrifted: Most of the books, blue pottery vase, picture frame, wood sculpture, blue ceramic planter, swan, brass votive, white ceramic planter.)

10. Vintage Leather Purse

I am a simple but somewhat picky woman when it comes to my purses. I have several rules: It must fit my wallet, it must be crossbody, and it must be versatile. This amazing vintage leather purse checked all of those boxes with flying colors. Everyone tells me it looks like vintage Coach because of the adorable hardware details, and I love that! I haven’t worn it much yet because my current black purse still has a little life left and I bought the leather one as a future replacement because it’s so hard for me to find purses that fit my criteria (does anyone else do that? Haha).

Well, that wraps up my top 10 thrift finds of all time! I hope you enjoyed seeing my favorites, and I’d love to hear about yours!

Xo Lizzie

What are some of your favorite thrifted finds? Do you tend to find more clothing finds or home decor finds? Leave a comment below!

Welcome to Our Home!

I can’t believe I’m writing these words, but we closed on our first house and moved in last Saturday!  The past two weeks have been a blur, and I’m just now getting time to sit down and write about it. 

The house is actually in our current subdivision (which we love) just two streets over.  We toured it the day it came on the market, loved it, and put in an offer. Since we knew there were already several other offers on the home, we offered a little over asking price and wrote a the sellers a cover letter saying how much we loved the home and how we could see ourselves making a life there together, etc.  In the end, there were six (!!!) offers on the house, and the sellers picked us because they liked our letter!  We had a few bumps along the way with the inspection, but it all worked out in the end.

Even though the home is newer, there is still some charm, and the exterior siding gives the house a cottage look.  And, there are plenty of projects 🙂 (That was on my house wish list, haha). The kitchen and bathrooms need updated, and the entire living space has parquet floors, so there is a lot for us to improve!  We already have so many ideas for how to update the space to fit our style.

For me, owning a home is pretty much my dream come true.  I’ve had a home renovation board on Pinterest for at least five or six years, so that tells you just how long I’ve been mentally preparing for this.  But the biggest reason we’re excited?  We will finally be able to experience the newlywed excitement of moving into our first place together.  Because Kendall moved into my apartment after we got married, we kind of missed out on the fun of starting our marriage in a new place together.  Even though Kendall’s stuff got mixed in with mine, the place still felt like my apartment.  We didn’t get to brainstorm where to put the couch or how to organize the kitchen cabinets–I’d done that already when I moved in three years ago.  We’re really looking forward to starting from scratch. 

Due to the variety of bright paint colors throughout the house that were not to our tastes, we decided to paint as much as we could before we moved in.  After closing, we took a week to paint paint paint. We had so much help from friends and family, and (amazingly) we got every room painted except the bathrooms.  We even got most of the trim painted. It was a lot of hard work, but the end results were so much better. I’m excited to share photos of what the house looks like painted, but I wanted to share the “before” photos first!  

So, here we go…

Welcome to our home!  It’s a 1,400 square feet single-level home built in 1990 with three bedrooms, two bathrooms, a garage, and a screened-in porch.  It’s a tan/beige color, but the siding needs replaced eventually, so we might go with navy or grey siding down the road.  The front yard has some nice landscaping that just needs a little TLC and lots of trimming. Eventually, I’d like to move the little Japanese maple that’s blocking the front porch so you can see the front door.

We have already replaced the doorknob, lock, and door mat at the front door, and it looks much better!  The porch needs pressure washed badly, and the space would greatly benefit from a potted plant and a porch light.  

There is no defined entryway, so you walk straight into the living room when you come through the front door.  

It’s definitely an impressive space with high ceilings and a fireplace.  As you can see, there are a lot of colors going on in this space, haha. The yellow, red, and green walls really make the floor look orange, but it’s much more brown in person.

The built-ins and trim on the fireplace are surprisingly nice features for a builder-grade house from the 90s.  Also, the hearth is marble, which was a pleasant surprise. The fireplace is gas, but it needs some repairs before it’s fully functioning.

The back corner of the living room is the entryway.  It’s definitely nothing special, so I would really like to make some built-ins in the nook, or maybe just add a nice set of wall hooks.

We have already updated the door knobs, door mat, and the light fixture, and it’s so much nicer.  Fun fact: the old light fixture barely cleared the door. There was about 1/8 in. between the tip of the light and the door when it opened.  It definitely made us nervous, haha.

To the right of the living room is the dining room.  It’s a surprisingly huge space, and the French doors in the alcove really bring some character to the room.  We plan on replacing the light fixture soon and adding some shades to the windows and doors.  

The French doors lead directly out to the screened-in porch, which might be one of my favorite spaces in the whole house.

I know it doesn’t look like much yet, but it’s a great space.  The peaked roof is so cute, and there’s a ceiling fan already installed.  We’re thinking about painting the walls black for some contrast, and I already have string lights to drape across the room.  I’m going to take the curtains down since they don’t fit the windows. We don’t need them for privacy since there is a fence and plenty of trees to block the view.

When you come back inside, the kitchen is to the left.

I know.  There is a lot going on in this space, haha.  Lots of orange wood and dated paint colors. But, the space is huge and fits our needs perfectly.  We definitely plan on painting the cabinets soon, and we’re hoping we can find a fridge to match the other stainless steel appliances on Facebook Marketplace or an outlet store.  And, of course, we cannot wait to replace those pink (yes, PINK) laminate countertops.    

One day, if the budget allows, we might tear down the silly pony wall between the living room and the kitchen, then use the space to make an island.  Since the wall doesn’t go up to the ceiling, it feels very disjointed and dated. This will be quite a ways down the road if it ever happens, but it would greatly improve the flow of the house.  I also really want to move the sink to be under the window instead of in a corner. There is so much wasted space back there!!  

To the left of the kitchen is a small hallway that leads to the master bedroom, the pantry, and the garage.

The master bedroom is huge.  We could easily fit a king-sized bed in here one day.  There’s also a really convenient walk-in closet, which was near the top of our house-hunting wish list.  The walls were even darker in person, and if you look closely, you can see that it’s splotchy, haha. It definitely needed another coat, but I’m glad they didn’t give it one because it took four coats of white paint to cover it all up.  

There is a fairly spacious master bathroom off the bedroom.

The master bathroom has a double sink vanity and a separate tub and shower.  The space feels large, but there is no linen closet, and overall, there is a lack of storage space.  Also, the shower is really tight (in my opinion). We’ve discussed eventually combining the tub and shower so we can turn the shower stall into a linen closet.  I think it would greatly improve the storage and functionality of the bathroom. (Side note: Please ignore the dirty shower. It has since been scrubbed clean.)  We plan to paint the vanity and replace the counter top. Also, as you can see, someone hot glued rocks to the edge of the mirror, ruining it entirely. We plan to pry the whole thing off the wall and replace it with two smaller mirrors.

On the other side of the house is another hallway where the other bathroom and bedrooms are.  

The second bedroom is what we will use as an office.  This room will be mostly Kendall’s space, so I wash my hands of whatever decor gets put in here, haha.  There is a huge closet though, which will be great for storing all his board games.  

Next is the hall bath, which will be our guest bathroom.  

It’s a pretty small bathroom, and it needs a lot of work, but I can see this becoming such a cute space.  We’ll definitely paint the vanity and update the light fixture and the mirror (another hot glue DIY gone wrong).  I already took the shutters off the window, so now I’m looking for another privacy solution for the space. Currently, there’s just a piece of Kraft paper taped in the window, haha.

The third bedroom is at the end of the hallway.

We plan to use this room as a guest room.  As you can see, the dark chocolate brown walls make the room feel really gloomy, despite the beautiful, big window.  It took three coats of white paint to cover it all up. On the bright (ha!) side, there’s a fairly spacious closet that will be great for storing my craft supplies.  

The laundry room is located right outside the guest room.  

There you have it!  I hope you enjoyed this short “before” tour of our new house.  I was so excited to share the photos with you, and I’m even more excited to start sharing our plans and progress.  Thanks for reading!

Xo Lizzie

What did you love most about buying your first house?  Or, what are some things on your future home wish list?  Let me know in the comments!

Welcome!

After many years of wanting to start my own blog, I’ve finally decided to do it. I find myself constantly typing down my thoughts in random Google Docs, Word files, and iNotes, so I thought, at the very least, a blog might help me consolidate those thoughts.

Additionally, Kendall and I are starting the process of finding and buying a home, and I wanted a way to document and share that process with my family, friends, and anyone else who might want to follow along. Our goal is to find a fixer, so I’ll have plenty of updates to share as we start the process of renovating our first home.

So whether you know me extremely well, only a little, or not at all… Hello! And welcome.